Htpowlasers's blog
How cool would it be if you could use a laser at home? How cool would it be if you could take that laser with you? Do you want a side hustle to let your artistic talents shine, or do you just want to create personalized items for family and friends? You can do this with the Laserpecker 3 Basic laser engraver.
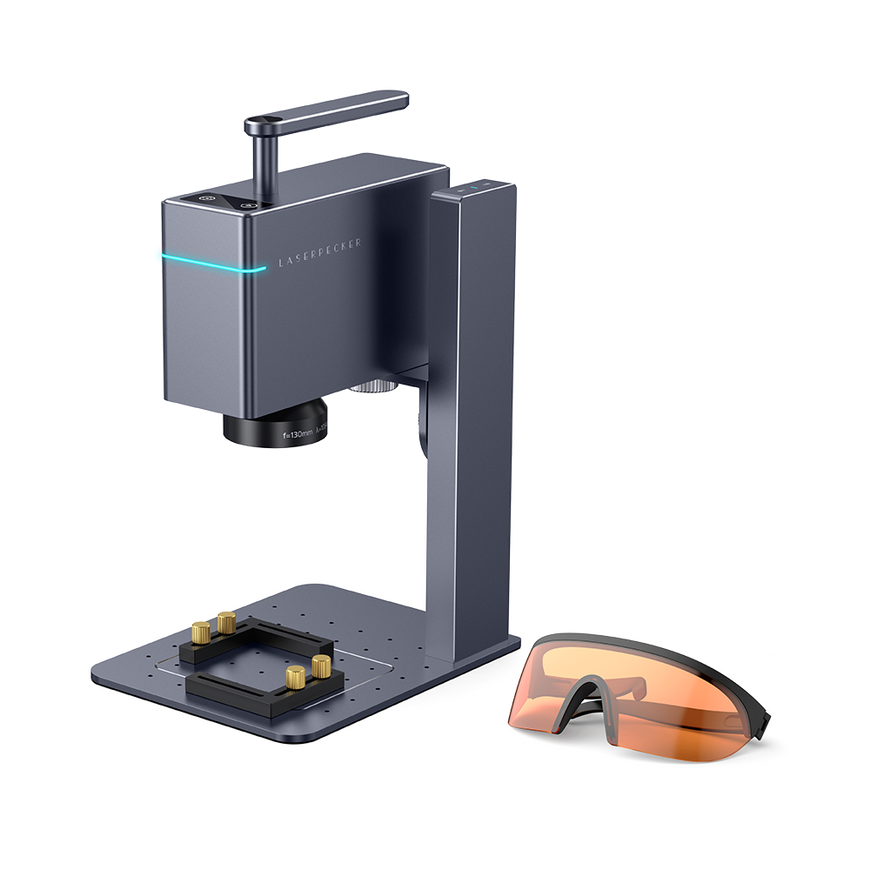
The Laserpecker 3 is a small pulsed fiber laser engraver designed primarily for metal and plastic, but claims to be suitable for other materials as well.
The Laserpecker 3 laser engraver is touted as the world’s smallest pulsed fiber laser. I have no idea what that means, but thanks to my Google-Fu, I now know that it uses a fiber optic cable as the gain medium instead of a crystal, and provides a pulsed output. Still confused? Me too. But hey! It's the smallest in the world!
The Laserpecker 3 is a solid piece of kit and looks stylish. It has an all-metal construction, which I assume is anodized aluminum. The finish is very nice and the unit is very sturdy.
On the back of the laser head unit you will find the power port, wired PC connection port and 2 USB ports for accessories.
There are 2 buttons on the top of the device. The one on the left will activate the centering laser, helping you put whatever you want to engrave in the correct position. The one on the right is the pause/on/off combination.
On the top of the stand are buttons for raising and lowering the Laserpecker 3 laser engraver head unit.
On the bottom of the stand, there is an alignment plate where you can mount the stand to align and stabilize your media. The plate is also removable so you can lift the Laserpecker 3 over it if your engraving is too large to get the correct laser focus.
Getting started with the Laserpecker 3 laser engraving machine is easy. Gatherings are rare. The head is attached to the bracket on top of the bracket with a large set thumbscrew.
The head has a groove that fits into the bracket, so the connection is very strong.
The bracket itself mounts to the base plate with the 2 included hex bolts. In this way, a few turns of the Allen key and the Laserpecker laser engraver is fully assembled.
To communicate with the Laserpecker 3, the manufacturer provides an app that allows your phone or tablet to communicate via Bluetooth. I have to say, this is probably the easiest Bluetooth pairing experience I've ever had. After installing the app, I made sure Bluetooth was active on my phone, powered on the Laserpecker 3, launched the app, and selected the device. It's really that simple.
Performance
This is where the rubber meets the road. I'm excited to fire up the Laserpecker 3 and start engraving, but the included manual doesn't say anything about how to actually do it. Well, I have the app, so there must be tutorials in there to help me decide which settings are best for my medium of choice. No. There is a community where people post some of the things they make, but most of the stuff is for the Laserpecker 2, which is a completely different device that uses a different type of laser. Also, the community has not had any new posts since July 2022.
I thought, shoot, I can fix this. How hard can it be? It's harder than I thought. If you use the limited amount of clip art included in the app, you'll do better than downloading your own. Or at least that's my experience. Using my phone to try and edit pictures was frustrating, to say the least, and the software wasn't the most user-friendly. I finally loaded my artwork, and I started the setup for the job. Here you have to enter the dimensions of your drawing and select your medium from the drop-down list. My first project was a Zippo lighter that I had as a kid. There is no stainless steel setting. Available in aluminum alloy and brushed stainless steel. So I went as usual. Next, you must set the power level, depth and number of passes. I don't know what to choose. I picked some random settings and let the "uh rip, potato chips!" My first attempt was off center, upside down, and not very dark. I adjusted the settings, flipped the zippo over, and tried again. It turned out okay. Still not perfectly centered, I wish it was bigger and darker.
I tried a few other things with the app and my phone. The next thing I tried was the sample plastic card and Gadgeteer logo from the kit. This is the first time I got it.
Looks good, but I think I'm either going too deep or passing too many times because the lines aren't very sharp. Again, I'm using the app, so editing pictures isn't ideal. Next, I tried the same thing again, changing the settings for the plot itself. It also looks good, but still doesn't have the crisp lines from a machine that's supposed to be engraving at 4K. I also had a lot of issues with the app disconnecting and stopping responding. If I find a problem and the app doesn't cooperate, I have to unplug the power from the Laserpecker 3 to stop it.
So I ditched the app and downloaded the Windows software. Well, guess what? This is beta software, so bugs and glitches may occur. I loaded the software and connected the Laserpecker3 with the USB cable. there is nothing. My laptop running Windows 11 can't see it. OK, try a different port. No. Try a different cable. Uh uh. Try different cables on different ports. got rejected. Restart the laptop and the Laserpecker 3 laser engraver. Well, now they're just laughing at me. I gave up again. A few days later, I tried again and this time my laptop connected to it. Cover your face. The PC software is a bit rough around the edges, but I can edit my photos more easily this way, however, I'm stuck. For some reason, to use my computer's bluetooth, I had to buy a separate adapter from Laserpecker. No, I don't understand why. I'll try my best and stick with PC software. They seem to be updating it more often than the app, so I hope things get better soon. Here are some of my successes and failures for your enjoyment.
I want a Laserpecker 3 laser engraver. I think I'd really enjoy it if I could work out these issues. My wife was determined to start a side business and wanted me to carve something for her to sell. If you're looking for something like the Laserpecker 3, I'd honestly look elsewhere right now. The Laserpecker 2 Pro that Julie reviewed a while ago might be a better choice. There seems to be more help available for this model. In the meantime, I'll be figuring out how to get the results I want, if that's going to kill me.
As more and more people discover the power of laser cutters and engravers, the possibilities and potential for creative projects and practical products skyrocket - and the income potential is just as great! The list of laser engraver cutter items for sale seems endless. With marketplaces like Etsy and other digital workspaces trending, it's getting easier to create and produce laser-cut products your customers love.
To make your journey easier, we've done the homework for you and compiled a list of the best-selling laser cutting projects and engraving ideas on Etsy that are sure to be a hit this year and beyond.
Whether you are just getting started with a laser cutter or have been using the technology for a while, our collection is the perfect place to start your creative journey and earn an income creating masterpieces with your laser!
70 Laser Cutters & Engravers Items By Category
Laser cutters and engravers can create stunning products in a variety of categories such as home decor, wedding and party decorations, jewelry and fashion accessories, toys and entertainment, and gift items. These products can appeal to different customers and markets, and can help you grow your laser cutting and engraving business. Below are some category examples of the top selling laser cutter and laser engraver items for 2023.
Laser Cut Home Decor Projects
Laser cutting and engraving products are becoming more and more popular in the field of home decoration. By using laser cutters and engravers, you can create beautiful and functional items that enhance the look and feel of any home. You can also customize your products with different designs, colors and personalization options to suit your customers' preferences and needs.
1. Custom Surname Signs
This customizable laser cut wooden sign project is a top seller on Etsy, making it a profitable and popular home decor item to add to your lineup. Made of high quality birch plywood or MDF, the large cutout letters are a stylish addition to any living space.
With easy customization options, you can offer customers the ability to personalize the sign with their last name or other text, making it a hot seller for housewarming or wedding gifts.
The precision and clarity of the laser-cut design make this sign a premium product that stands out, and its versatility allows it to fit a variety of home decor styles. With high customer reviews and ratings, you can confidently add this laser cut home decor to your products and watch your sales skyrocket.
2. 3D Wooden World Map Art
This Wooden World Map Wall Art is a stunning product item that will impress your clients and boost your sales. Made from high-quality plywood, this laser cut project is laser cut and engraved for precision and detail. It comes with pins that allow your customers to mark their trips and plan their next trip.
This wooden world map wall art is a versatile product that can fit any interior style from rustic to modern. This is a great gift idea for travelers, adventurers, or anyone who loves to explore the world. You can offer your customers maps of different types and sizes, as well as add-ons such as country names, flags, or LED lights.
3. Decorative Acrylic Wall Clock
This laser cut cat silhouette wall clock is a cute and colorful piece that will make your customers smile. Laser cut from two layers of acrylic (black matte and yellow gloss), this clock creates a great contrast and is easy to mount on any wall. It features a silent quartz movement that won't tick, making it perfect for the bedroom or office.
This laser cutting project is a fun and unique product that will appeal to cat lovers, kids, or anyone who likes simple designs. You can offer your customers clocks in different colors and sizes, as well as silhouettes in different shapes.
4. Wall-mounted keychain
This laser cut key and belt holder is another project in the list of easy and beginner laser cutting projects. With your creativity and laser cutting possibilities, you can create endless designs and styles to suit different customers' preferences.
The practical design is perfect for keeping your keys and leash organized and within easy reach. Not only is this product a great item to sell on your online store, but it can also be offered to your local customers as a customized product.
5. Wooden Animal Planter
If you're looking for a fun and unique home decor item to add to your collection, look no further than this laser cut corgi planter holder project.
It's made of high-quality plywood and has an adorable corgi shape that you can customize with the color and name of your choice, making it the perfect gift for any dog lover or plant lover. The laser cut design ensures a crisp and detailed finish to impress your clients. With high customer reviews and ratings on Etsy, you can add this laser cut home decor piece to your collection and watch your sales skyrocket.
6. Decorate Bookends
These laser cut bookends make a great gift for book lovers and can be customized to suit their personal taste. Bookend features a fun design and features sentiment "I Love Books". They are made of high-quality plywood and cut with precision using a laser cutter. This project is a great example of how laser cutting can be used to create creative and personalized items for customers.
7. Wooden Lantern Candle Holder
This candle holder is a beautiful and natural home decor laser cut project that features tree designs with animals such as deer, foxes, birds and squirrels. It's made of birch plywood and laser-cut with beautiful details. Candelabra holds tea lights or small pillar candles and creates a cozy and inviting ambiance when lit.
You can sell this product online or in your local market, where you can reach customers who are looking for rustic and natural home decor items. You can also provide candle holders in different designs or sizes to suit different preferences and occasions.
8. Personalized acrylic night light
This personalized night light is a romantic and custom laser engraved idea for any couple. It features the couple's name, date and a heart laser-engraved into acrylic and wood. The night light has an LED base that can be changed in color and brightness with a remote control. The night light can be plugged into a wall outlet or powered by batteries.
You can sell this product online or at bridal fairs, attracting customers who are looking for romantic and custom gifts for their loved ones. You can also provide night lights in different designs or shapes to match different themes or styles.
9. Personalized wooden door hanger
This laser cutting project is a great opportunity to tap into the growing home improvement market. You can use a laser cutter to create high-quality wooden signs that can be customized with your client's last name and preferred shape. You can also offer different fonts and colors to suit different tastes and seasons.
This laser cutter project is cost-effective, time-saving, and beginner-friendly because the project is simple and you can make your logo in less than an hour. You can sell these door hangers online or at your local craft fair and attract customers who are looking for unique and personalized home decor items.
10. Decorative wooden door stop
This laser cutter project is a clever way to combine functionality and aesthetics. You can use a laser cutter to produce a beautiful and durable plywood pineapple that can be used as a door stopper. This project is easy and quick to make and can be modified for different sizes and colors. You can sell these door stoppers online or at your local gift shop and attract customers who are looking for fun and functional home accessories.
I'll show you how to make a laser engraved cut board and we'll walk you through the process from design to finish.
A cutting or serving board is an essential in any kitchen, it is where vegetables are cut and prepared and the surface on which they are presented and served.
Here we are using the atomstack a10 pro laser engraver.
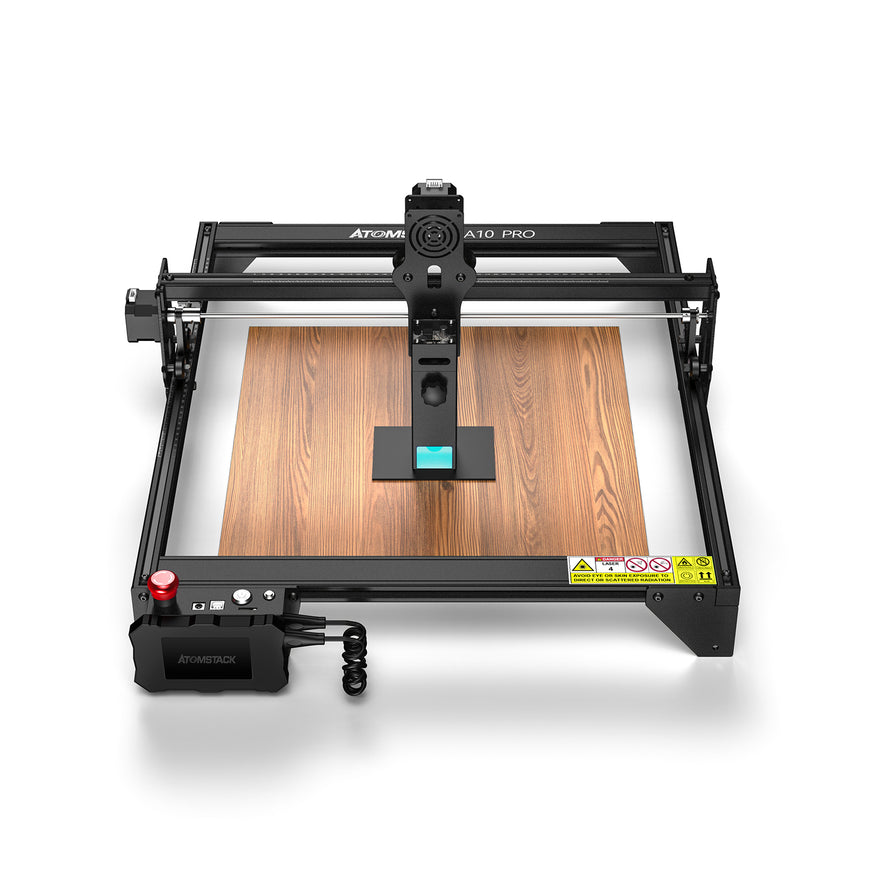
Follow along as we design and engrave a custom cut board with a laser engraver.
how to carve wood
You can carve wood in several different ways. Over the years, I've shared two wood-burning techniques that are both affordable and easy to master.
Watch how to carve a cutting board
A wood burning tool is a handheld heating tool that burns wood. You can use it like a pen to draw patterns on any type of wood surface.
Burnt markers apply a substance to the wood that, when used in conjunction with a heat gun, burns the design into the wood. This marker can be used with a template to create detailed wood fired designs.
Both of these techniques are great ways to create small designs by hand without breaking the bank.
The next level up in engraving is the laser engraver. I own an Aufero Laser 2, a high quality machine built for crafters and hobbyists. This machine is perfect for my craft room, engraving and cutting dozens of materials.
Watch me unbox and create a simple project with this laser.
Can it be engraved on a cutting board
Yes, exactly! You can engrave custom text and images on the solid wood cutting board. These are great gifts for your friends and family.
Laser engraved cut boards require a few extra steps to ensure they work properly. Read on for all the details.
How to Design Graphics
The first step is to create a design to use on the cutting board. I love using Canva, an easy-to-use and very affordable online design program. There is a free version to try, and I recommend the pro version, which costs $119 per year. Try using Canva to create your own laser engraved designs.
Use a blank canvas and add design elements and text to create exactly what you want engraved on the cutting board.
Once the design is complete, export it as a PNG file.
Using LaserGRBL
There are 2 programs you can use to run your laser engraver; LaserGRBL and Lightburn. Lightburn is a more advanced paid program that allows you to design and create on a larger scale. I suggest you use LaserGRBL until you are happy with the machine, then upgrade as needed.
Connect your machine in LaserGRBL, click the unlock button at the bottom, and open the design file you just created in Canva.
For engraving on wood I use the following setup.
Line to Line Tracking
horizontal direction
8 lines per mm
These settings work perfectly for me, but I encourage you to experiment with different variations and see what you like.
Next, crop the design to remove any white space around it, and click Next. On the next screen, you'll set the dimensions of your design in millimeters, as well as the machine speed. Use the book icon in the Speed section to select the recommended settings for your machine and material.
Now that the design is ready, you need to set up the laser. Click on the center at the bottom of the screen, this will move the laser to the center of the design. From here we can focus the laser.
Loosen the setscrew, slide the cutting board under it, and place the amber acrylic piece on top of the wood. Tighten the setscrew and remove the acrylic. Now the distance of the laser to the wood is perfect.
Back in the LaserGRBL software, click the frame button. This will draw a frame around the design on the wood, it won't leave a mark, but it's a good way to see if your design ends up the way you want it to.
Once everything is properly placed, it's time to carve. Put on the goggles and click the green play button to start the sculpting process.
How to Finish a Carved Cutting Board
There are 2 more steps to ensure that this cutting board will work properly.
First, sand the surface and edges of the wood with 150-grit sandpaper. This removes any rough spots that would interfere with the food.
Wipe the cutting board with a soft cloth to remove surface dust.
Finally, coat with several coats of cutting board oil. This is food grade mineral oil that helps protect and nourish the wood. With regular use, the oil will ensure your boards don't dry out and crack over time. For a board of this thickness, I recommend 3 coats.
We cover how to make your own laser engraved cutting board, from start to finish. Be sure to watch the video and save this article for future reference.
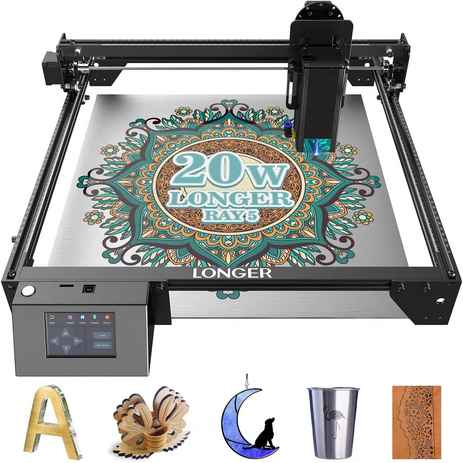
There are also laser engraving machines with the same power: longer ray5 10w, sculptfun s10, twotrees tts-10
Laser cutters and engravers can create stunning products in a variety of categories such as home decor, wedding and party decorations, jewelry and fashion accessories, toys and entertainment, and gift items. These products can appeal to different customers and markets, and can help you grow your laser cutting and engraving business. Below are some category examples of the top selling laser cutter and laser engraver items for 2023.
Laser Cut Home Decor Projects
Laser cutting and engraving products are becoming more and more popular in the field of home decoration. By using laser cutters and engravers, you can create beautiful and functional items that enhance the look and feel of any home. You can also customize your products with different designs, colors and personalization options to suit your customers' preferences and needs.

1. Custom Surname Signs
This customizable laser cut wooden sign project is a top seller on Etsy, making it a profitable and popular home decor item to add to your lineup. Made of high quality birch plywood or MDF, the large cutout letters are a stylish addition to any living space.
With easy customization options, you can offer customers the ability to personalize the sign with their last name or other text, making it a hot seller for housewarming or wedding gifts.
The precision and clarity of the laser-cut design make this sign a premium product that stands out, and its versatility allows it to fit a variety of home decor styles. With high customer reviews and ratings, you can confidently add this laser cut home decor to your products and watch your sales skyrocket.
2. 3D Wooden World Map Art
This Wooden World Map Wall Art is a stunning product item that will impress your clients and boost your sales. Made from high-quality plywood, this laser cut project is laser cut and engraved for precision and detail. It comes with pins that allow your customers to mark their trips and plan their next trip.
This wooden world map wall art is a versatile product that can fit any interior style from rustic to modern. This is a great gift idea for travelers, adventurers, or anyone who loves to explore the world. You can offer your customers maps of different types and sizes, as well as add-ons such as country names, flags, or LED lights.
3. Decorative Acrylic Wall Clock
This laser cut cat silhouette wall clock is a cute and colorful piece that will make your customers smile. Laser cut from two layers of acrylic (black matte and yellow gloss), this clock creates a great contrast and is easy to mount on any wall. It features a silent quartz movement that won't tick, making it perfect for the bedroom or office.
This laser cutting project is a fun and unique product that will appeal to cat lovers, kids, or anyone who likes simple designs. You can offer your customers clocks in different colors and sizes, as well as silhouettes in different shapes.
4. Wall-mounted keychain
This laser cut key and belt holder is another one of the easy and beginner laser cutting projects. With your creativity and laser cutting possibilities, you can create endless designs and styles to suit different customers' preferences.
The practical design is perfect for keeping your keys and leash organized and within easy reach. Not only is this product a great item to sell on your online store, but it can also be offered to your local customers as a customized product.
5. Wooden Animal Planter
If you're looking for a fun and unique home decor item to add to your collection, look no further than this laser cut corgi planter holder project.
It's made of high-quality plywood and has an adorable corgi shape that you can customize with the color and name of your choice, making it the perfect gift for any dog lover or plant lover. The laser cut design ensures a crisp and detailed finish to impress your clients. With high customer reviews and ratings on Etsy, you can add this laser cut home decor piece to your collection and watch your sales skyrocket.
6. Decorate Bookends
These laser cut bookends make a great gift for book lovers and can be customized to suit their personal taste. They are made of high-quality plywood and cut with precision using a laser cutter. This project is a great example of how laser cutting can be used to create creative and personalized items for customers.
7. Wooden Lantern Candle Holder
This candle holder is a beautiful and natural home decor laser cut project that features tree designs with animals such as deer, foxes, birds and squirrels. It's made of birch plywood and laser-cut with beautiful details. Candelabra holds tea lights or small pillar candles and creates a cozy and inviting ambiance when lit.
You can sell this product online or in your local market, where you can reach customers who are looking for rustic and natural home decor items. You can also provide candle holders in different designs or sizes to suit different preferences and occasions.
Laser engraving and laser marking are two common techniques used in the field of customization and personalization.
Both methods involve using lasers to etch designs into a variety of materials, from metals to glass and plastics.
However, despite the similarities, there are some notable differences between the two technologies.
In this article, we'll explore the differences between laser engraving and laser marking so you can make an informed choice about which method is best for your specific needs.
Definition of Laser Engraving
Laser engraving is a process that uses a laser beam to remove surface material and create a permanent design. The technique is used to create designs on a variety of materials, including metal, glass, stone, leather, acrylic, and other types of plastic.
A laser beam is fired at the surface, burning or vaporizing the material to create the design.
The precision, accuracy and versatility of laser engraved materials make them ideal for creating intricate designs and logos, as well as inscriptions such as serial numbers and product codes. In fact, there are many different laser engraving ideas.
For example, laser engraving is often used in industries such as jewelry that require fine details, or in the production of machine parts that require durable and long-lasting markings.
The depth of engraving can be controlled, allowing shallow or deep designs to be created.
The end result of laser engraving is a permanent mark that will not wear or fade over time.
Definition of laser marking
Laser marking, on the other hand, is a process that uses a laser beam to alter the surface of a material rather than remove it. Laser beams create permanent marks on the surface of a material, usually by oxidizing or discoloring the material.
Laser marking is commonly used to mark items such as electronic components, medical devices and consumer goods.
The main advantage of laser marking over laser engraving is that it is a non-contact process, meaning that no physical contact is required with the material being marked. This makes laser marking a more efficient process for mass production as it does not cause any wear and tear on the material being marked.
Laser marking can also be used to create barcodes, QR codes and other types of identification marks.
The marks produced by laser marking are usually lighter than those produced by laser engraving, but they are still permanent and will not wear down over time.
BrandsThe main types of laser marking include:
Annealing Laser Marking
Annealing laser marking uses high heat to change the color of metallic materials such as stainless steel, creating a permanent high-contrast mark.
Carbon Migration Laser Marking
Carbon migration laser marking uses high heat to move carbon from metallic materials to the surface, creating contrasting marks with a high level of detail.
Foam laser marking
Foam laser marking uses high heat to create small air bubbles within the plastic material, creating raised permanent marks on the surface.
Color laser marking
Color laser marking uses a high powered laser to change the color of certain materials, such as anodized aluminum, creating a permanent and highly visible mark.
Laser source
The source of the laser beam is also a key difference between laser engraving and laser marking. Laser engraving typically uses a CO2 laser, which produces a beam ideal for removing material from surfaces. Laser marking, on the other hand, typically uses a fiber laser, which produces a beam that is ideal for altering the surface of materials (particularly metals such as stainless steel and titanium) without removing the material.
The choice of laser source will depend on the specific needs of the project, a CO2 laser is a better choice for engraving and a fiber laser is a better choice for marking. Selecting the correct laser source is very important to ensure that the results are of the highest quality and the process is as efficient as possible.
Cost
The cost of laser engraving and laser marking can vary widely, depending on the specific equipment and materials used and the complexity of the design. Laser engraving usually requires more specialized equipment and is more expensive than laser marking.
However, the cost of laser marking can also add up quickly, especially when marking large numbers of items.
When choosing between laser engraving and laser marking, it is important to consider the total cost of the project, including the cost of equipment, materials, and labor.
In some cases, it may be more cost-effective to use laser marking, while in other cases laser engraving may be a better option. It is important to perform a cost analysis to determine which option is best for your specific needs and budget.
Quality of the mark
The quality of the marks created by laser engraving and laser marking can also vary.
Laser engraving creates deeper, more permanent marks, perfect for intricate designs and fine details. The marks created by laser marking are usually light but still permanent and are best suited for creating simple marks such as product codes and identification marks.
The quality of the mark also depends on the laser source used and the specific equipment and materials used. When choosing between laser engraving and laser marking, it is important to consider the specific requirements of your project to ensure the end result meets your standards.
Material compatibility
Finally, it is important to consider the compatibility of the material you are marking with laser engraving or laser marking.
Some materials, such as glass and metal, are well suited for both laser engraving and laser marking, while others, such as some plastics, may only be suitable for either method.
It is important to choose the correct method for the specific material you are working with to ensure the highest quality end result.
If you are unsure about the compatibility of a material with laser engraving or laser marking, it is best to consult a professional or do some research to determine the best method.
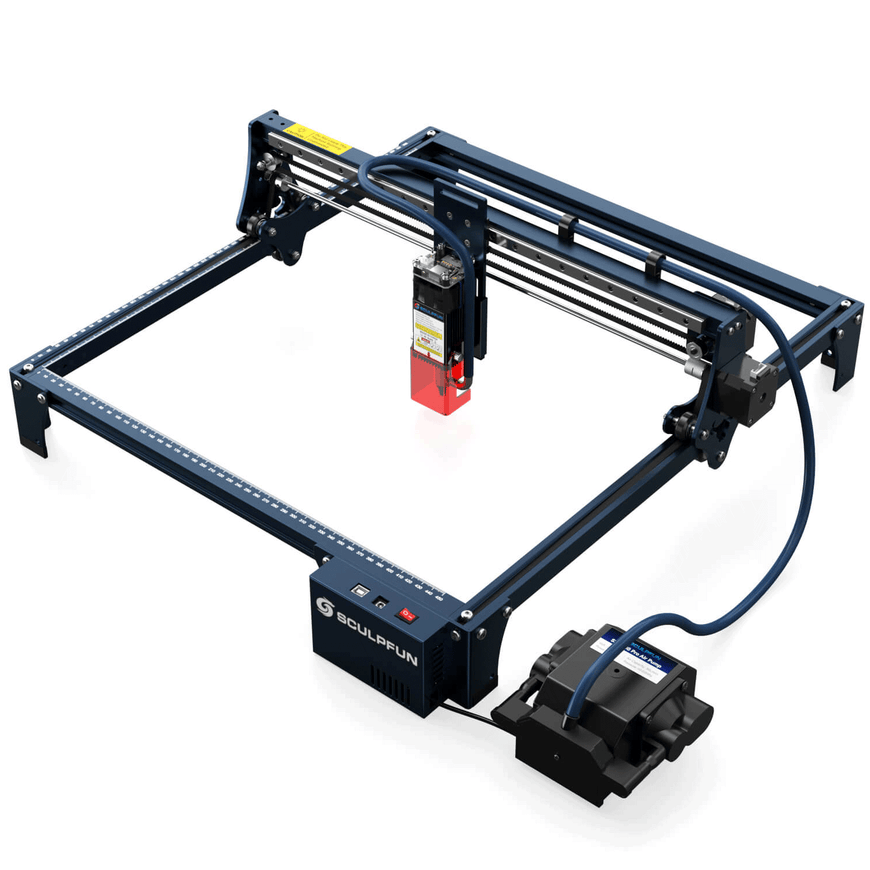
Hot Link:A Sculpfun laser engraver is an amazing tool for any home crafter. They allow you to cut and engrave many types of solid materials such as wood, metal, and acrylic. If you already own a Cricut or similar cutting machine and find that you want to create even more, a laser might be your next step.
What can a 10W diode laser do?
Diode lasers are great for cutting and engraving a wide variety of materials. It's safe, small, and lightweight for crafters and hobbyists alike. Here are a few materials you can process with a 10W laser.
Wood; Plywood, MDF, Basswood, Oak, Cherry, etc.
Acrylic fiber; solid colors and transparent colors with some modifications
Metal; stainless steel and some types of aluminum
Ceramics
Stone
Leather
Cardboard or thick paper
For each material, you can choose to cut shapes or engrave surfaces, or combine the two for projects.
Sculpfun S30 Pro 10W
The machine is equipped with a powerful 10 watt diode laser and has an eye shield for extra protection. It is mounted on a sturdy metal frame and can be expanded with kits. The working area of the laser after packaging is 380×385 mm.
The laser moves on a rod with extra support to keep the movement smooth. The laser moves fast and the sturdy frame limits possible wobble.
One of the things I like about this laser is that it includes air assist. Air assist injects air vapor onto the material while the laser is running, which prevents the material from burning or scorching, giving you a clean, great-looking project.
Most lasers in this price range don't come with air assist, which you'll need to buy separately. This is a huge bonus and probably my favorite feature of the Sculpfun S30 Pro.
Sculpfun lasers come in a variety of styles and you can choose from a smaller 5W laser or a high powered 20W machine. This 10W version is perfect for home hobby cutting and engraving.
Laser engraving machine installation
When it comes to assembling the frame and hooking up the lasers, the setup is pretty straightforward. Everything comes in a box and is clearly labeled. You will also receive a laser repair kit, safety glasses and some sample materials to get started.
With the basic frame set up, you can hook up the air assist that will run through every project you do. You can't turn it off or adjust the pressure. It's been good for every project so far and I wouldn't choose to turn it off.
This model can also optionally be fitted with limit switches. These are great features that automatically stop the laser in corners and help home the device while creating projects.
I found the instructions for installing these and the amount of work involved to be overwhelming. I chose not to install limit switches on my model and ran it as is with no issues.
One criticism I have is that the switches are factory installed so the customer doesn't have to deal with this task.
The Sculpfun YouTube channel has some great videos on setup and operation. There are also some neat project ideas on this channel.
How to operate Sculpfun S30
The laser engraver must be plugged into an outlet and connected to the computer via USB. There is an upgrade kit that allows for Bluetooth connectivity, but needs to be purchased separately.
Once connected, you can use free software like LaserGRBL to create projects. Or a paid product like LightBurn which has more features.
Always wear eye protection and make sure the room is well ventilated when operating this laser. I use my computer next to an open window and the fan is always on in the room. Always wear goggles!
To set up the laser on a protected surface, I placed a piece of thick plywood under the laser to protect my tabletop. You can also buy cellular bases that are compatible with this and other similar models. Honeycomb combined with air assist will ensure very little charring on the cut edge.
Laser engraved gifts give you unlimited opportunities and potential. Laser engraving can elevate an ordinary gift to the extraordinary as it can become a marker of a special occasion. It can tell those closest to you in your life that they matter and that you want this gift to be something they can cherish forever. Below we've rounded up some of the best gift ideas for items that can be laser engraved for the special people and moments in your life.
Charcuterie board
Custom charcuterie boards are the perfect gift for any occasion. Whether someone has friends over for a big game, needs to enhance their weekly game night, wants to add a little something extra to their book club, or wants to celebrate a special anniversary, laser engraved deli boards can bring endless possibilities. Fun and fun. Unique options.
People can also create a centerpiece in their kitchen and pass it on to the next great chef in your family. These boards also make a great wedding gift and can be paired with a meat and cheese basket for a mini second honeymoon for newlyweds. An engraved charcuterie board is a memorable gift that makes a statement and always tells a story as friends enjoy a delicious meal.
Custom knife
From multi-tools to buck knives to chef's knives, your customers will be able to show that special someone they really care about with a thoughtful custom laser engraved knife. It is a versatile gift for any Mr or Mrs Repair, because with a personalized multi-tool, any situation can be easily solved.
For outdoor enthusiasts, a personalized Buck's knife is a camping must-have. If any of your clients are hunters or fishermen this is a great option for them as they will need it at all times. A personalized buck knife will be a lasting gift and a talking point for a long time.
Every great chef has a beautiful and reliable chef's knife in their arsenal, so your customers will be able to tell the chef they care with this ultimate laser engraved gift. Such a knife will be something they see and use every day, making it a thoughtful and beautiful gift to add to a chef's collection.
Wine glass
An ideal gift for any occasion, laser engraved wine glasses are one of the most versatile items a person can give to someone they care about. Ideal as a gift for birthdays, weddings, anniversaries, or celebrating a company milestone, the laser engraved wine glass will be a permanent reminder of that special moment.
Custom wine glasses also provide a fun way to mark and commemorate small special events, such as a vacation weekend with friends or as a keepsake for an extraordinary gathering. It's a great way to tell eventgoers that their presence is important, and the memories will live on every time they salute with a laser-engraved wine glass.
Photo frame
Laser engraved photo frames can be the perfect container to preserve your clients' most cherished memories such as graduations, birthdays, weddings, vacations and many more moments in life.
A personalized photo frame is the perfect gift for those with whom we have a close bond, as it signifies that we will create many more memories together in the future. Let your clients gift the closest ones in their lives with gifts that showcase thousands of words of memories.
Engraved gifts are the perfect way to turn what might initially be considered an ordinary gift idea into a truly special, memorable gift that your friends or family members will never forget. The beauty of laser engraving a special message on a gift is that it can instantly transform an item from an ordinary item to a collectible keepsake. For example, a plain old picture frame will join many others in the home, but a personalized picture frame will have a special place in the home.
However, if you plan to visit your local gift shop or mall, don't plan on engraving gifts quickly, easily, or just the way you want them. Most gift shops do not offer in-house laser engraving, which means that anything you buy in store has to be shipped offsite, which can take weeks. Likewise, there are some national laser engraving chains, but they don't usually do the work on-site, they charge a lot of money, and often they are limited in what they can engrave as a gift.
Engraved Gift Options
When you work with a good laser engraver, you can always know when they have a variety of engraved gift options for you. Generally, if you come across an online gift retailer with lots of disclaimers about what they can't do, chances are they don't do the engraving themselves.
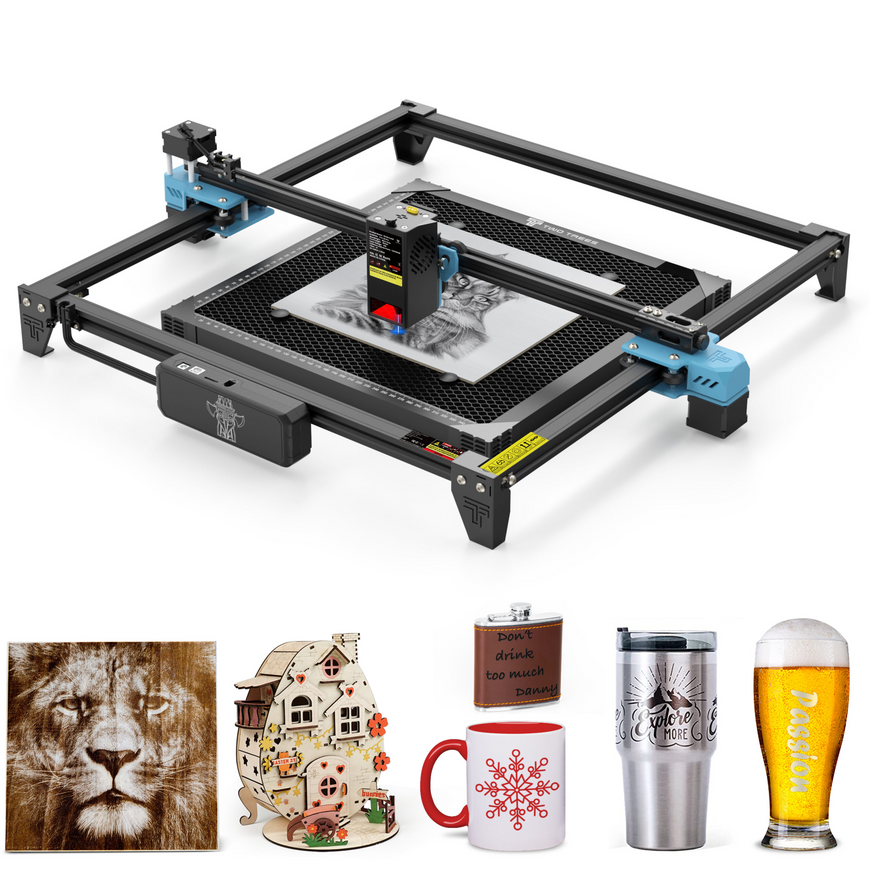
Laser cutters are now easier than ever to use. If you run a small business, investing in one is a great idea. Laser cutters and engravers offer precision, accuracy and repeatability that hand tools cannot match.
If you think the cost of a laser cutter will exceed your budget, don't worry. While high-end machines cost $5,000 or more, you can find good budget options around $500.
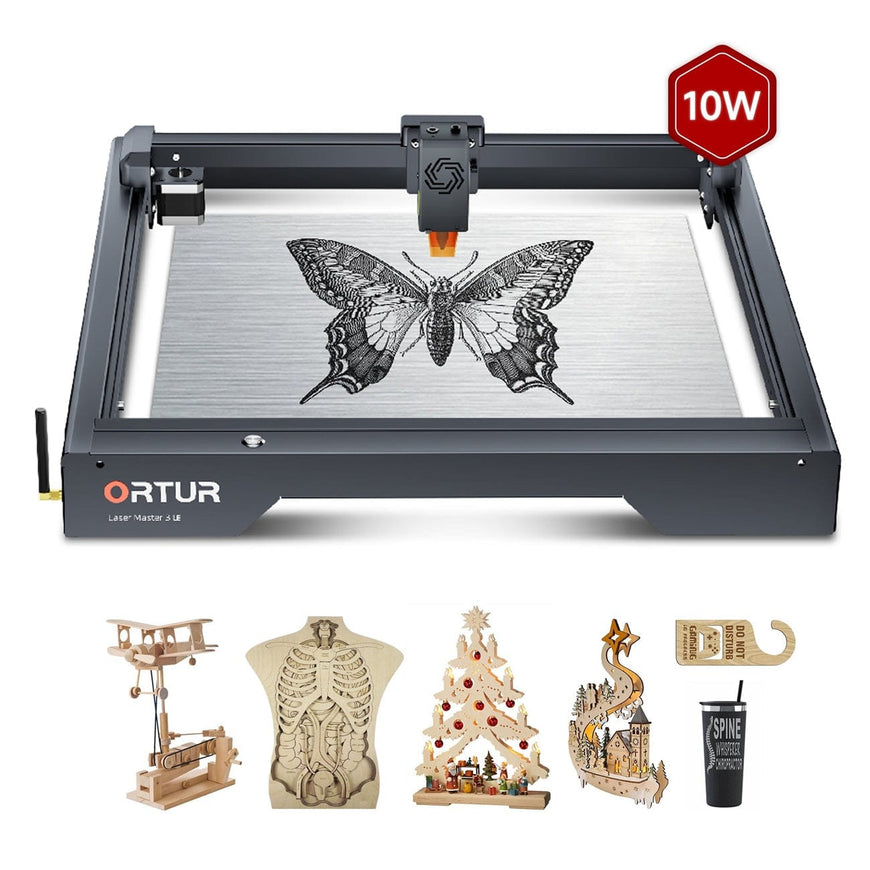
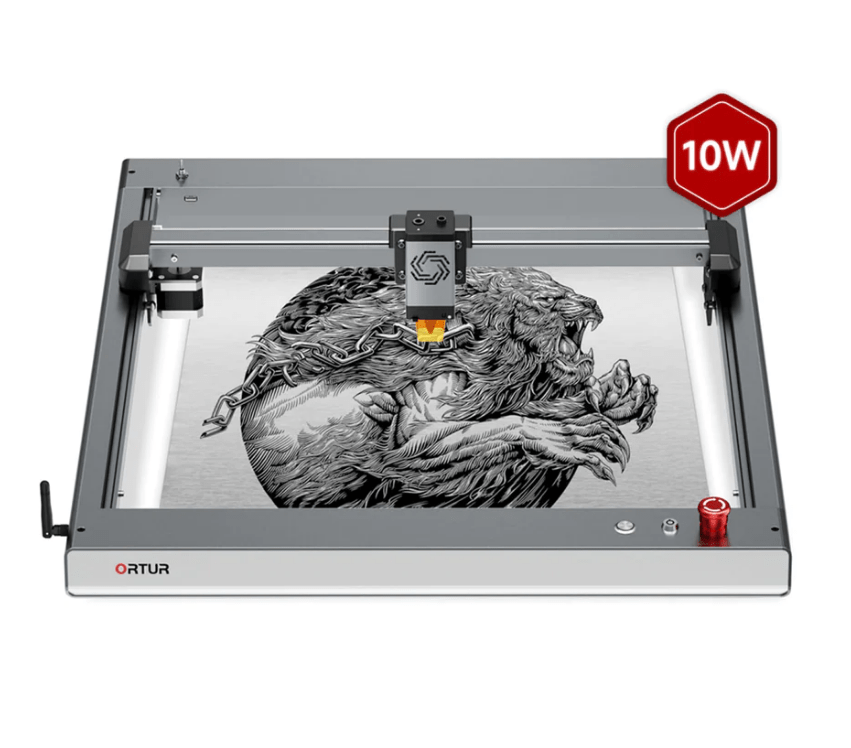
For example, our top pick, the Ortur Laser Master 3, is the best laser cutter for small businesses at a relatively affordable $599. It is the ideal tool to enter the world of laser cutting. Later, you can transition to a CO2 laser cutter with higher power and speed capabilities.
No matter how powerful the laser cutting machine is, as long as the quality is good, the machine will soon pay for itself. From engraving to cutting, it can help you make a variety of products.
Let's take a look at our top picks and review the best tips to consider when buying a laser cutter for your small business!
Ortur's laser cutter is the best laser cutter for small business due to its low price and great performance. The Ortur Laser Master 3 is no exception, offering upgraded laser performance that is even better than its predecessor, the Ortur Laser Master 2.
Ortur includes a premium 10W laser module capable of engraving and cutting a variety of materials including wood, leather and plastic with a small spot. This delicate balance of power and precision helps you sculpt intricate details on materials with ease.
Focusing on user safety, the Laser Master 3 features a secure lock key system with active position and slope detection and an emergency stop button. These features are hard to find in cheap laser cutters, but can be helpful in an emergency.
Ortur already supports LM3's Laser Explorer application. You can easily engrave any design or picture and control every aspect of the machine through this mobile app. In addition, the device is compatible with other laser cutting software such as LightBurn and LaserGRBL.
However, perhaps because of its app functionality, Ortur doesn't include physical control buttons on the laser cutter. This may restrict some users. Although this machine has an integrated air assist system within the laser module, it also does not include an air assist pump.
All things considered and minor inconveniences, Ortur's Laser Master 3 is arguably the best laser cutter for small businesses. Even with small batches of laser cutting, you can quickly recoup your initial costs and start turning a profit right away.
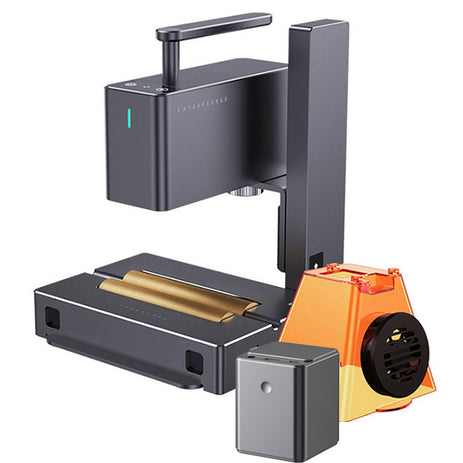
LaserPecker lasers are among the top handheld laser cutters you can find today. They're small, portable, and offer powerful performance in a compact form factor. The LaserPecker 3 is no exception. It follows in the tradition of its predecessors by giving you the option of engraving on metal surfaces.
The LaserPecker 3 weighs only 2.5 kg (5.5 lbs) and has an excellent build quality that matches its design. You can connect it to an external battery and get 4 hours of laser engraving time, allowing you to really enjoy the benefits of a portable laser engraver.
It has a 10W laser module with a fixed engraving area of 60 x 60 mm. Since it's a handheld laser, you can quickly reposition it and expand your work area. The galvanometer arrangement inside the laser module helps you achieve high engraving speeds up to 600 mm/s while maintaining a sharp 0.01 mm laser beam spot.
The LaserPecker 3 comes with its companion app, which allows you to control the machine using your laptop or smartphone. You can create designs from scratch, or engrave existing images onto workpieces directly from the app.
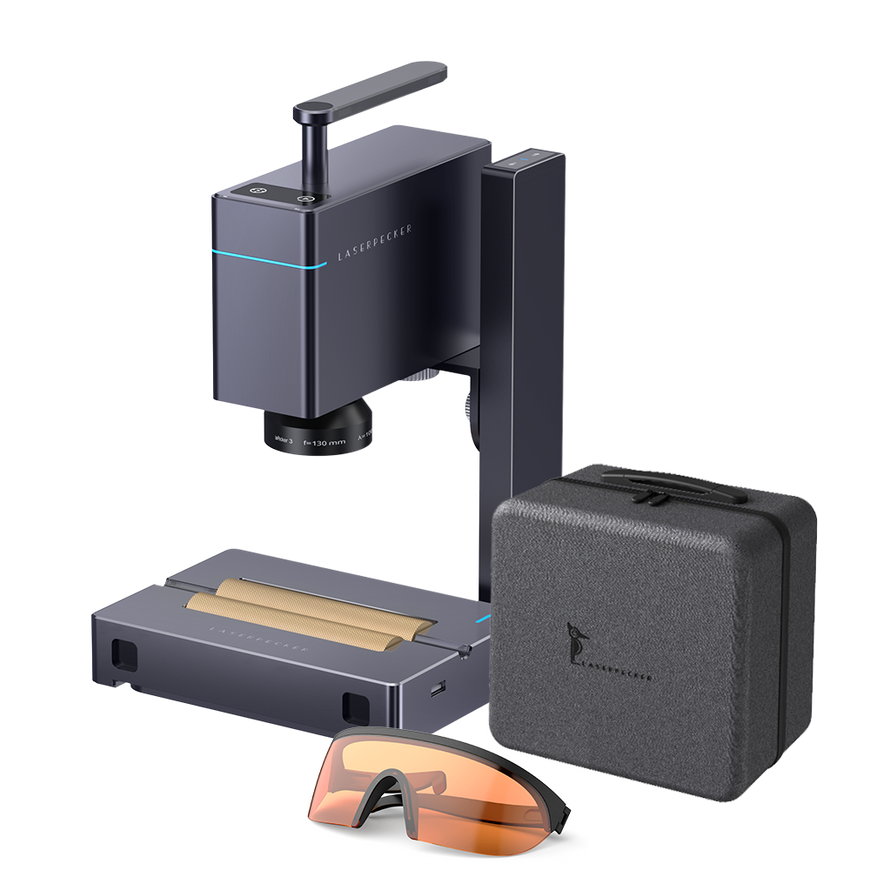
The main disadvantage of LP3 is its relatively high laser power. While its portability is a plus, better and more powerful laser engravers can be found in its price range.
However, for the business owner or hobbyist, the LaserPecker allows them to bring their laser cutter to the actual job site. This mobility factor, combined with the potential for engraving on metal, is enough to justify its nearly $1,500 price tag, making it the best laser cutter for portable workflows.
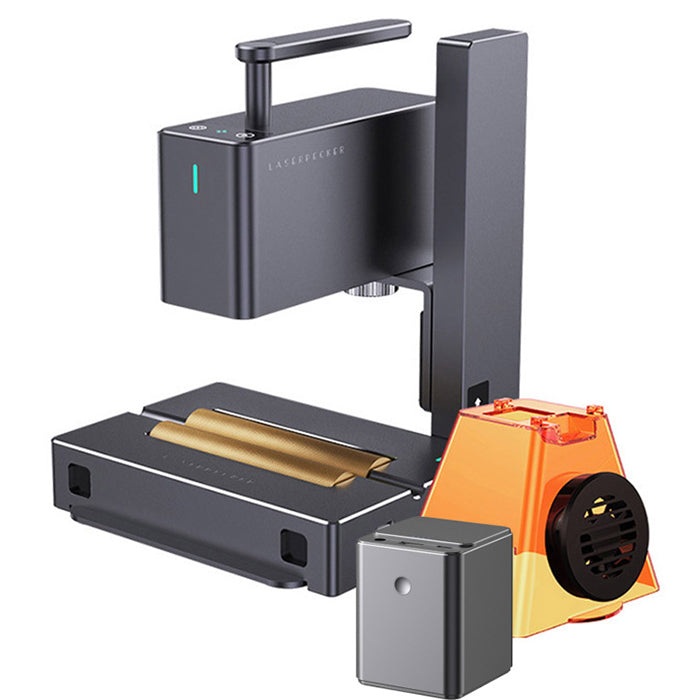
This compact laser engraver is characterized by engraving cylindrical materials, which sets it apart from other engravers. It has unparalleled advantages, and its precision and speed are at the top level in the industry.
The LaserPecker 2 is a compact laser engraver designed for shops and businesses with engraving needs for many cylindrical objects. It is a powerful machine with ultra-high working speed, ultra-high engraving precision and ultra-portable. This engraving machine is made of aluminum profile frame, which is strong and durable. It launched on March 2, 2022, and has quickly become a popular choice for businesses.
If you want more information on laser engravers other than LaserPecker machines, read our Laser Engraving Machine Buying Guide.
The LaserPecker 2 is a compact laser engraver with several features that set it apart from other engravers on the market. One of the most notable features is its connectivity options, including WiFi and USB. This allows users to easily connect the laser engraver to various devices, making it more versatile and user-friendly.
In terms of speed, the LaserPecker 2 is also impressive. The speed is 36000mm/min, and the preview speed is 3750mm/s, which is super high and ensures high-efficiency engraving. This means the machine can engrave quickly and efficiently, saving users time and increasing productivity.
The engraving area of LaserPecker 2 is also impressive, with an area of X100*Y2000mm. That's enough for most engraving needs, making it a versatile tool for businesses requiring engraving services.
Another notable feature of the LaserPecker 2 is its rotation, a 360° versatile drum motor. This feature allows to engrave cylindrical objects, which is a unique feature unmatched by other engraving machines. This makes the LaserPecker 2 ideal for businesses that need to engrave cylindrical objects such as bottles, mugs and pens.
LaserPecker 2 also has an impressive 168H continuous working time, ensuring uninterrupted engraving. This is especially useful for businesses that need to engrave a large number of items in a short amount of time.
In terms of security features, the LaserPecker 2 is equipped with a protective cover, goggles, combination lock, tilt protection, overheating protection, and more. These safety features ensure safe machine use and prevent accidents. A protective cover and safety goggles protect the user from laser radiation, while a combination lock prevents unauthorized access to the machine. Tilt protection and overheating protection functions ensure that the machine can be used safely even in the event of a malfunction.
LaserPecker 2 is compatible with a wide range of software including AI, BMP, JPG, PNG, DXF, SVG, G-Code, CDR and DWG. It is also compatible with LightBurn and LaserGRBL which are all compatible with Windows XP to W10, Linux and Mac OS. However, it is not compatible with Benbox, GrblController, LiteFire or any other software.
The LaserPecker 2 has a number of advantages that make it an excellent choice for businesses requiring mass customization. One of the machine's most notable strengths is its unrivaled cylindrical material support. This feature sets it apart from other engraving machines on the market and makes it ideal for businesses that need to engrave cylindrical objects such as bottles, mugs and pens. The machine's swivel capability allows it to engrave cylindrical objects with ease and precision, making the LaserPecker 2 an invaluable tool for businesses requiring engraving services.
In addition to cylindrical material support, LaserPecker 2 also has super high working speed and super high engraving precision. This ensures that engraving is efficient and of the highest quality, saving businesses time and increasing productivity. The speed and precision of the LaserPecker 3 make it an invaluable tool for businesses requiring engraving services, such as the promotional product industry.
Another advantage of the LaserPecker 2 is its portability. The machine is compact and light in weight, easy to move and use in different places. This feature makes it ideal for businesses that need to engrave objects on-site, such as at a trade show, event or at a client's location. The portability of the LaserPecker 2 allows businesses to provide engraving services in different locations, making it a versatile and valuable tool.
The safety features of the LaserPecker 2 are also a plus. The machine is equipped with protective cover, goggles, password lock, tilt protection, overheat protection. These safety features ensure safe machine use and prevent accidents. A protective cover and safety goggles protect the user from laser radiation, while a combination lock prevents unauthorized access to the machine. Tilt protection and overheating protection functions ensure that the machine can be used safely even in the event of a malfunction.
The LaserPecker 2 has some drawbacks that you should be aware of before purchasing. First, it has few compatible software options, which may be a limitation. This means you may need to purchase additional software to use with your engraver, which adds to the overall cost.
Second, the LaserPecker 2 is pricey and may not be suitable for businesses on a tight budget. However, if you can afford it, the benefits of the machine may outweigh the cost.
Overall, the LaserPecker 2 is a powerful and efficient compact laser engraver ideal for businesses requiring mass customization. Its cylindrical material support, ultra-high working speed, and ultra-high engraving accuracy make it the first choice for merchants who need to engrave cylindrical objects. Its security features and portability make it easy and safe to use. Despite its high price and few compatible software options, the benefits of this machine probably outweigh the cost. If you're in the market for a compact laser engraver, the LaserPecker 2 is definitely worth considering.
If you are in the market for a compact laser engraver, HTPOWLASERS is a great place to start your search. HTPOWLASERS is a website that sells various brands of laser engravers, including the LaserPecker 2. Our wide selection of products makes it easy for you to find the right engraving machine for your business needs.
Visit our website to learn more about their products and find the perfect laser engraving machine for your business.
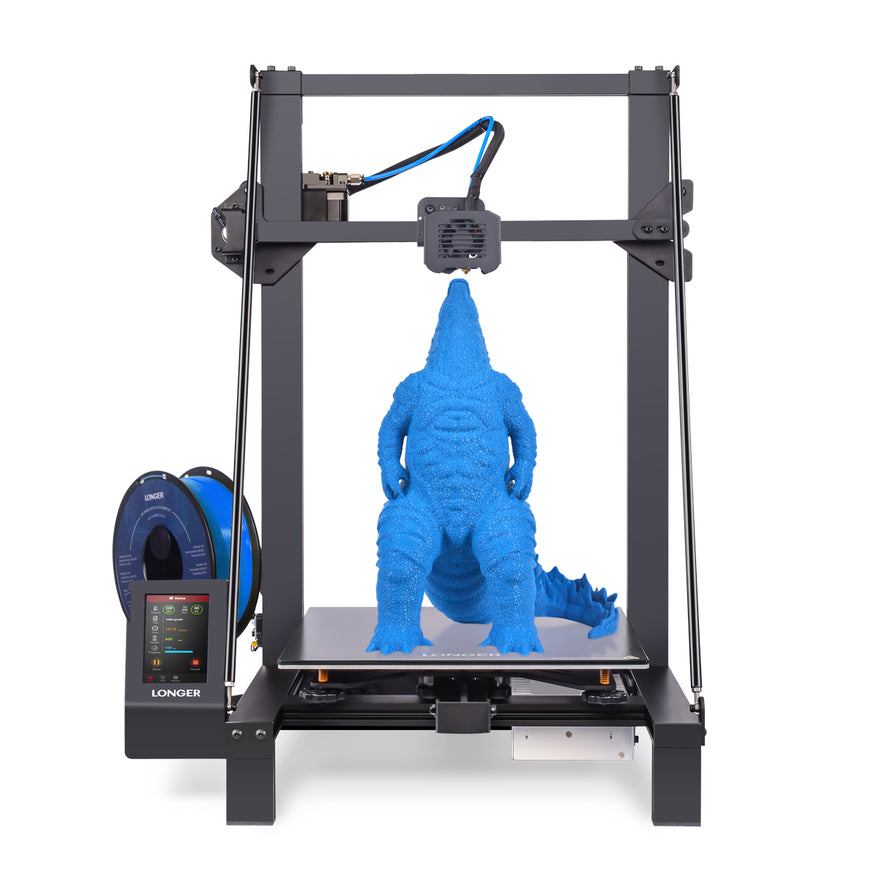
The Longer LK5 Pro is currently the Shenzhen-based manufacturer's flagship FDM 3D printer, and it's one of the fairly affordable devices that promises to offer a similar experience to pricier 3D printers. And, to my surprise, the combination of simple design and thoughtful functionality works really well for Longer. In fact, after some basic adjustments, I got some very good benchmark print results that compete with pricier printers.
You need to keep in mind, though, that while it's not very difficult to assemble, you'll need over an hour to put everything together, and it will require some fine-tuning that I'm not entirely sure will make the complete assembly be complete. Beginners are happy.
This is true for the entire 3D printing industry as it hasn't figured out a way to make things easier for new users - I know most people just want to take their printer out of the box and start printing without any adjustments.
I also know that people interested in 3D printing won't be turned off by a little tweaking, and the Longer LK5 Pro does offer the user a color touchscreen LCD that works well, along with a heated bed and a bonus feature. The glass bed, and the manufacturer also added some stabilizer bars to help reduce vibration. Furthermore, the device comes with an open-source motherboard, so it's easy to upgrade the LK5 Pro to your liking. That being said, let's examine the Longer LK5 Pro a little deeper and see if it can be considered the best 3D printer in its price range.
Design and Build Quality
The extended LK5 Pro isn't a successor to the regular LK5, as the manufacturer prefers to use the word Pro to mean using the same color LCD and larger bezel as the LK4 Pro. Obviously there's some marketing crap going on here too. Anyway, the 3D printer is larger than both the LK4 and LK4 Pro when fully built, measuring 22.8 x 21.2 x 26.1 inches (58.0 x 54.0 x 66.3 cm) and weighing 29.8 lbs (13.5 kg), so yes, you do need to Plan where it will be placed as it does take a lot of space. The good news is that the print measures 11.8 x 11.8 x 9.8 inches (30.0 x 30.0 x 40.0 cm), so you can create very large models.
The 3D printer comes partially pre-assembled, since the PSU+ mount connects to the X-axis arm and extruder, so you have to assemble everything else. Inside the package you will find a tall gantry, screw rods and support beams. Due to the taller profile of the Longer LK5 Pro, these beams were necessary to limit vibrations. They do work as expected, but there are a few factors that can cause vibrations, as you'll see in the sections below.
The manufacturer also installed a screw bearing bracket to help hold the screw in place, an upgrade over the exposed Lk4, along with a Z-axis motor, a limit switch, a filament holder, and a touchscreen display.
Additionally, Longer has added a plastic strain relief bracket that you can mount underneath the heatbed and help support the PSU cable. Almost everything is made of metal, with the exception of a few elements, such as the filament holder, which has proven strong enough to hold a heavy coil of filament. The hotbed is made of metal and can reach a temperature of up to 100 degrees Celsius (212 degrees Fahrenheit), however, since it is not insulated, it will take longer to heat up. I also need to mention the extra glass bed you can put on top of the hotbed, which is a great addition, as it's much easier to disassemble the models this way (no forceful removal, they just pop off). The surface is also much more uniform when working with glass, as evidenced by calibration (manually, with a piece of paper). I know some of you might like to see a print room, but that's still out of the question at this price point.
You do get the triangular design, and I do like that the teflon tubing from the extruder to the hot end can handle temperatures up to 280 degrees Celsius (536 F), but note that only supports temperatures up to 250 degrees Celsius (482 building). Another cool element is the filament end sensor, which automatically pauses printing if it detects that the filament is out, then resumes printing after you add the filament back in. The same is true when power is lost, so you don't have to worry about restarting printing, as the Longer LK5 Pro will pick up where it left off when power is restored. I wasn't too sure about the hot end fan duct at first, as it's pretty much the same as the one on the LK4 Pro, but it seems to perform well. You always have the option to print an upgraded version of it, so you can improve it if you get stuck.
The first thing out of the box is the gantry, along with the screw and two support rods. Then there's the spatula, card reader, and microSD card - when you remove this part, be aware that the glass bed is not attached to the assembly, so it could fall and shatter (we don't want that). The rest of the 3D printer is almost pre-assembled, but there are some important parts that need to be added. Before installing anything, I flipped the pre-assembled part of the printer over, and as you can see, the longer plastic feet can (and should) be replaced with silicone feet. The plastic feet are useless for jerks or shocks, while the rubber feet do a good job of absorbing some vibrations.
Then there's Cheng Liang's P360W24V power supply, which is a fairly generic power supply, but should work just fine. Fans have always been a weak point of Longer 3D printers as they can be very loud, the LK5 Pro does have three fans (in addition to the PSU fan) - one on the base of the frame and two on the end of the X-axis beam (for the hot end).
Interestingly, the fans aren't as loud as on the LK4 (the LK4 pushes the 12V fans to 24V), by far, but they're still the easiest part to hear as the Longer makes pretty much everything else quiet - except Exception for extruders. To see why, I decided to open up the main section and had to remove quite a few screws using one of the provided Allen keys. With that, I can see that the LGT_KIT_V1.0 board has three detachable silent steppers (TWC2208) with a small heatsink on top, and the processor is an 8-bit Arduino ATMEGA2560. The extruder does have a different stepper driver (as I expected), and it's not the silent type (couldn't recognize it), but the good news is that you can replace it if it bothers you.
If you look around the PSU you'll find a sticker with instructions to switch between 230V and 115V depending on your country - since I'm in Europe at the time of writing I set the switch to 230V , which is the default, but I know that in the US, you need to change it to 115V.
Once finished, you can start the assembly, according to the instructions on the box, we need to pass the X-axis beam through the gantry rod, and then turn the assembly screw into the X-axis beam dedicated brass nut. Next, I took the X-axis motor and two M4*16 screws, and screwed the motor to the gantry. I then inserted the lead screw into the top of the motor and after unscrewing the coupling's screw the lead screw slid in. Now you can adjust the height of the X-axis beam. The next step requires four M5x20 screws that you will need to secure the gantry to the base. Accessing it from the bottom is very difficult, so it's best to set the whole assembly aside so that the screws can be easily inserted into place. Now it's time to add the support rods, for this you need to use four M4*8 bolts and make sure there is a 90 degree angle between the gantry and the base. I needed to adjust the support rods a bit as the angles were really off, which is absolutely necessary if you are using four bolts to connect two tall columns.
After finishing, use two M4*16 and two M5*20 bolts to connect the limit switch and the filament holder. The limit switch is on top to hold the screw in place and the filament holder is on top of the printer beam. I was a bit surprised by the filament holder on the Selpic Star A Mini 3D printer, but here it seems to be a bit more solid, despite also being made of plastic. After that we need to install the display, the area where the display needs to be added is very obvious as it is the only part where the aluminum is exposed. So take two M5*6 bolts to attach the display and attach the Z-axis limit switch near the X-axis motor. Next we need to connect all the wires so connect the Z cable to the Z axis limit switch, another Z cable with more pins to the motors and the LCD cable to the back of the display. A thick PSU cable connects to the back of the metal bed, then an E-cable with more pins is added to the extruder block, and another E-cable goes to the filament detector. The other two X cables go to the motor.
We're not done yet, as you'll need to use the wrench provided to stabilize the bed. There are three screws underneath that need to be tightened (or loosened) so that the bed loses the rocking effect - use the moving plastic wheel to get a feel for the screws. Now it's time to adjust the heat bed - to do this, turn on the printer (turn it on) and tap the "Leveling" tab on the display. You will now see five points and you will need to click on each one at a time and adjust the wheels from under the bed until all five parts allow you to move a piece of paper with just a little resistance.
It's important to know that you have to go to 4 and back to 1 several times until the seedbed is properly leveled, and yes, this can take quite a while (I played about 20 minutes). I've noticed that the spring quality is good, but the knob could be bigger as it's not easy to move and adjust - you can print new knobs now. Before you start printing anything, it's also a good idea to check that the X-axis motor is moving smoothly, if not, take a wrench and adjust the screw from under the motor.
The Longer LK5 Pro does have the same color display as the LK4 Pro, and it's still pretty good. It's a touchscreen, so no buttons, and generally very responsive, except in areas where some tabs are too narrow - so I had to try two or three times to get the right area. Other than that, the LCD screen is fast and responsive. Immediately after powering on the 3D printer, the display will show six tabs, the first tab is called "Move", which essentially allows you to manually move the hot end (you can also return it to the main position), and the second The second tab is "File". Here you can see all printable 3D models. This only happens if you have inserted a microSD card or connected an external drive or computer to a USB port.
The third tab allows you to adjust the LK5 Pro (bed and nozzle temperature, fan speed, flow, and nozzle flow), while the fourth tab allows you to add or remove filament, as well as select the type (it works with ABS and PLA use). The last two tabs can be used to level the hotbed and check some info about the Longer LK5 Pro.
The cool thing is that you can adjust your print from the LCD display without having to re-slice the model again like you do with other cheap 3D printers.
